Thursday, June 11, 2015

Bennett Wagsley Foster

So today I want to share all the pictures of our adorable dog Bennett.  

We got him from Our Pals Place on Canton Rd. It's a great place to adopt/rescue a pet from.  They mostly have dogs, but there are some cats too. 


We don't know much about Bennett before he came to us.  He was at O.P.P. for 6 months and was adopted and returned in that time by a college boy who couldn't have pets in his apartment.  We think he may have  been abused in his former life before O.P.P. because he is quite timid at times. 


Bennett loves: wagging his tail, treats, licking the plate, socks, sniffing, walks, being next to his people and training for the ultimate battle. He especially loves Jeff.  Jeff saves him table scraps!


The two pictures above are of Bennett's sock.  He loves socks.  Sometimes we call him Dobby.  He gets Dobby ears and a sad look on his face that seems to say "why would you want to take my sock away?"  


This is a good picture of him, he was still for a whole 3 seconds! As you can tell, it's usually hard to get him to be still long enough to get a picture.


Bennett in his crate.  We call him Wagsley because when you let him out of the crate he wags his whole body in greeting.  *and lest you think we are cruel for locking him in there, he likes it.  Dogs are den animals and have an instinct for small places.  There are several other places around the house he goes to on his own.  Also, he is a chewer and will chew on anything in his reach: glasses, fit-bits whole spools of thread etc.  


He also likes car rides. 


I have never had a dog.  Daniel has had somewhere around 5 dogs.  He told me that we would be getting a dog before we got married.   I didn't really want the responsibility of a dog yet, but Daniel finally wore me down sometime in February and we went to look at dogs.  Bali (that's Bennett's "jail" name) looked straight into our souls.  Daniel likes to say that for him it was love at first sight, he just had to convince me.  I am happy to say that I love Bennett Wagsley more than I thought I would love a doggie. I am so grateful to have a fluffy little doggy to greet me when I get home.  


Love,
Sarah

Tuesday, June 2, 2015

Newest Project: My Grandma's Chairs

So, my grandma always had these chairs in her family room.  My grandparents lived in Florida so they didn't seem so ugly then as they do now, but they were hers and they were quaint and old.  Well I suppose the time comes when all your stuff you've collected over a lifetime gets divided up and given away and/or thrown out.  If you are lucky you have descendants who want it.


(to make up for the lack of pictures here's a pretty flower)

If you know Daniel and I, you know we like old stuff.  It's usually better quality, it always has a story and blending old and new is always creatively inspiring.  (Maybe that's why I have 100 projects started....hmmm )

 
(my attempt to get a picture of the world's cutest sock stealer)
{"Master has given Dobby a sock"}


Some of my family went down and got some things from my grandmother's storage unit and they brought these chairs up for me.  They were Gold crushed velvet and they were pretty gross. It was threadbare and stained in some spots.  I knew I could make them over.


I meant to take pictures of it throughout the process, but it was so much and I didn't know what I needed to do next.  When I do the second chair I will photograph it better.  :)  For now, this is what I've got.  These chairs are going to hang out in our Living Room, especially when we are hosting as they provide extra seating!!


Side by side. 

I also decided that the buttons on the bottom were too much and a little uncomfortable. 

Also, these chairs and our house are from the same era so I think it's fun to have them around.  The styles mesh or something....? :)


I have to say that it's not perfect, but I am really happy with the results.  
(the one above doesn't have the trim around the top portion yet, but I was too excited)

I also hope that none of the cousins who read this particularly wanted these chairs because my mom and Aunt figured they were so "well loved" and outdated that no one else would. You are welcome to come sit in them anytime. ;-) 

I am glad that I get to keep these chairs in the family and actually use them because I have so many happy memories of my grandmother's house.  I was thinking the other day about my grandparents house, giving myself a mental tour and remembering memories all over the house, from sliding down the stairs to exploring the attic and picking tangerines in the backyard.  It was such a blessed and lovely childhood haunt.  

What about you? Do you have any memories of your grandparents house?  Have you ever recovered anything? I would love to hear about it, see pictures or read your blog posts about it! Leave me a comment. :) 

Next time I will have some Garden news for you.  It's looking really good!

Love,
Sarah


Friday, May 22, 2015

Front Door Update!

Hey!

Real quick I wanted to show you the small step forward I've taken on the front door!

I painted it....


YELLOW!!!!


More to come later!! 

love,
Sarah


Wednesday, May 13, 2015

master bath transformation

Well this project is all but done, but I am so excited about it, I felt like I had to share! 

I really disliked this bathroom from the start.  It used to look like this:


Peachy-Tan is not a pretty color.  This is the color my skin turns when I burn and then it turns into a tan.  It's just pink enough for me to not be a huge fan.  In February I up and painted the walls grayish brown. 


A definite improvement, but not wonderful. So I did some research, and despite everything my mother and others said about painting tile, you can.   So I went to Home Depot and bought some primer that is specifically designed to adhere to extra smooth surfaces. It's called 1, 2, 3 primer.  It worked really well!


Above is my friend Emily helping me paint the tile.  On the right is after the one coat of primer.  You might be able to see that it's covered, but you can still see some peachy-tan is peeking through.  Which is really perfect, because I still had an enamel layer to paint on.


While we were painting I pulled off this horrid stuff.  It's vinyl shoe-molding.  It was probably nice when they put it up, but it's very yellowed and dirty. The issue with this being up is that they glued and caulked it on.  So the glue and caulk were partially left on when I pulled all this off.  


You can sort of see where I didn't paint all the way to the bottom.  I also opted to try painting the tiled in hardware (tp holder and towel bar).  I worked wonderfully.  While it's drying this paint levels itself out, which is wonderful!  It dries very glossy and beautiful. It looks just like enamel tiles with white grout.  There is ONE single spot (that I've noticed) that has some little drips. :( but everywhere else it looks great.  Jeff even told us he forgot that it was pink before. Win.  


 We used this groutable tile and white grout.  After reading reviews and seeing pictures from the website about this Traffic Master vinyl tile we decided to grout it, so it would look more like actual tile. We also used the piping method.  It was really hard at first, not sure if the grout was a little too dry or the bag not right or it was just lack of experience, but I eventually let Daniel do all the grouting.

I didn't let him have all the "fun" jobs though.  I marked the tiles for cutting.  Which was pretty cool actually.  I used some math skills that I thought would never get used. Hooray! It's not perfect, but it will work. The hardest cuts were around the toilet and in the doorway.  Daniel did the actual cutting with a exacto knife and a heat gun.  when heated this tile cuts like butter.


Whole floor and a closeup.  (for reference, the tiles are 2 square feet)  It's an oddly small, yet spacious bathroom.  It was remodeled (the only one in the house to be before we moved in) to be used by the handicapped.


This is what the top of the walls looked like before we added the crown molding.  The blue tape marks where the studs are.  You can't see it in this picture, but some places in the ceiling really need sanding down and retaping over seams, but we didn't want to tackle that so as best we could we covered it up with Large crown molding. 

I thought I had a picture of it with the molding but I don't, so I'll update it really soon with the picture. So make sure you check back!!

Love,
Sarah


Wednesday, May 6, 2015

the kitchen floor saga

Ok, I know it's a tad dramatic to use the word saga, but it's true.  It's so true.

Maybe it's just that I'm a woman,or maybe I'm too much of a cheapskate, but I changed my mind and couldn't make up my mind about this floor so. many. times.

Just for reference, this project started with ordering materials back in early October and we finally got the floors in somewhere around late January/Early February.


Let's start at the very beginning,

(a very good place to start...
Whoops, I'm getting off track, I'm about to start singing.)  

Ok, floors.  So, first of all: keeping what we had was not an option.  It was gross and nasty and had to go.  But we were smart about it.  We did ALL of the painting and staining throughout the house before we replaced any of the flooring so as not to mess up our brand new floors.


While we were doing all the painting around the house, I thought about, designed, researched and ordered materials for the kitchen floors. When I was planning and designing something inside me knew that red and light blue was a super retro combination for a kitchen.  I knew we were updating a lot of things and keeping the color scheme retro I hoped would make the updates fit in with the older feel of the house.  

Below are pictures of what our cars looked like when we picked up the order.  Saggy. Those boxes were SO VERY heavy.


as a side note, I also ordered materials for the backsplash.  I LOVE hexagons and penny tile, they are so cute and vintage and just adorable. However, as cute as I thought they were  I didn't think the blue went well with the blue on the walls and I thought the hexagons looked a little cluttered with the floors I was considering.  Maybe knowing what I know now, I would have used the hexagons with white grout, but what we went with was MUCH cheaper.


So because we had to paint and clean and repair so much when we first moved in and we had to replace some things, we were spending money left and right.  More than I ever thought, so I tried to find the best price on durable but cheap materials.  This led me to VCT tile.  That's the stuff you see in Hospitals and Schools. 


They are 12x12 vinyl tiles that come in lots of colors. At about 68 cents a tile, I figured they would work. 


I ordered 7 different colors of grey because there were no samples in any store.  I ordered all the grays I thought might work so that I could see the actual colors in our kitchen.  These 5 made it to round 2.  I also ordered a box of red to use as an accent tile.  I compared them all to see which two grays I would use with the red.  When we stained the cabinets and got the countertops it made the choices a little easier because we had other greys to compare it to.


I drew up some pattern plans. These involved cutting and slicing the tiles with a tile cutter. 
It would be very involved, but I figured it would be worth it in the end. 

You may want to get up and stretch at this time. 
 I know this is a long one, but really I'm just getting started. 

After we stripped, stained and sealed the cabinets we started peeling off the floor. Well, sounds easy, but it was so much more than just removing the old sheet vinyl.  We had to remove three layers of sheet vinyl and three layers of glue and replace parts of the floor that were water damaged and rotting.

Yikes.  


So we (we: Jeff with help from Daniel, while I cleaned something or painted something) had to replace the sub floor under the dishwasher and under the refrigerator.   The basic process of that was to pull up/cut up the vinyl over layer so that we could see exactly where to cut.  Some of this was visible from the basement below and some of it could be felt when it was walked on and most of it was visible to Jeff's trained eye because of warps and dips in the vinyl. 


So after that was in Daniel scraped up the rest of the floor.  Which took. FOR.EV.ER. 
You can probably tell from the pictures, but it came up in very small pieces.  The top layer came up fairly easily.  The bottom two layers had a very strong glue between them and they were brittle from age.  It was painstaking. 


Then under the (sort of cute) faux pebble layer on the bottom was a blue/grey felt-like backer. (Pictured above along with the under dishwasher patch) Dun.Dun.DUN.  Yeah, we think it was probably Asbestos. Ew.  Daniel and our friend Lena and Daniel's brother Seth, used hot water soaked towels to get it up so they wouldn't inhale any more particles than they had already disturbed.  They got most of it up this way and we decided to leave the tough patches, it wouldn't hurt right? **This is not a researched or proven method, it just seemed right for us at the time**


So then to level out the floor and prepare it for tile.  I did some research and found that there was a self-leveling compound(float) that could be bought at the Home Depot.  Sweet. We can spread stuff on a floor.  When Seth was here, he did it for us.  It was great!! It looked great, it took more "float" and time than we thought, but it looked great.  So we left it to dry.  

When we came home to find it dry, we walked across it and it cracked!!!! NOOOOO! It was the Asbestos felt that was loosened by the wet float. (Mr. PotatoHead needed his angry eyes)  So, we (again, we is Seth and Daniel) scraped that part up and got up all the felt, then poured more float. UGH. but now it was really done.  And it looked great. :)

So we talked and we debated and we talked some more. We asked friends and family who knew about replacing floors and we decided that we should go with real tile because: it's grouted, so it's more forgiving of the cuts, it's classier, it will sell better when we decide to sell and it's not too many more dollars.

So out we go again to shop for tile.  We went to Floor and Decor and Home Depot and all the other Home Depots in the area. To make this brief, I am going to just show you all the pictures I took of the options we considered.


(that last one is at the Fox, I wish I could have found something like it that wasn't $$$)


So we ended up with the three options below.  I posted these pictures to FB and let the people vote. Also, my parents and Daniel's mom and Seth and Lena and Jeff all let us know their thoughts. 


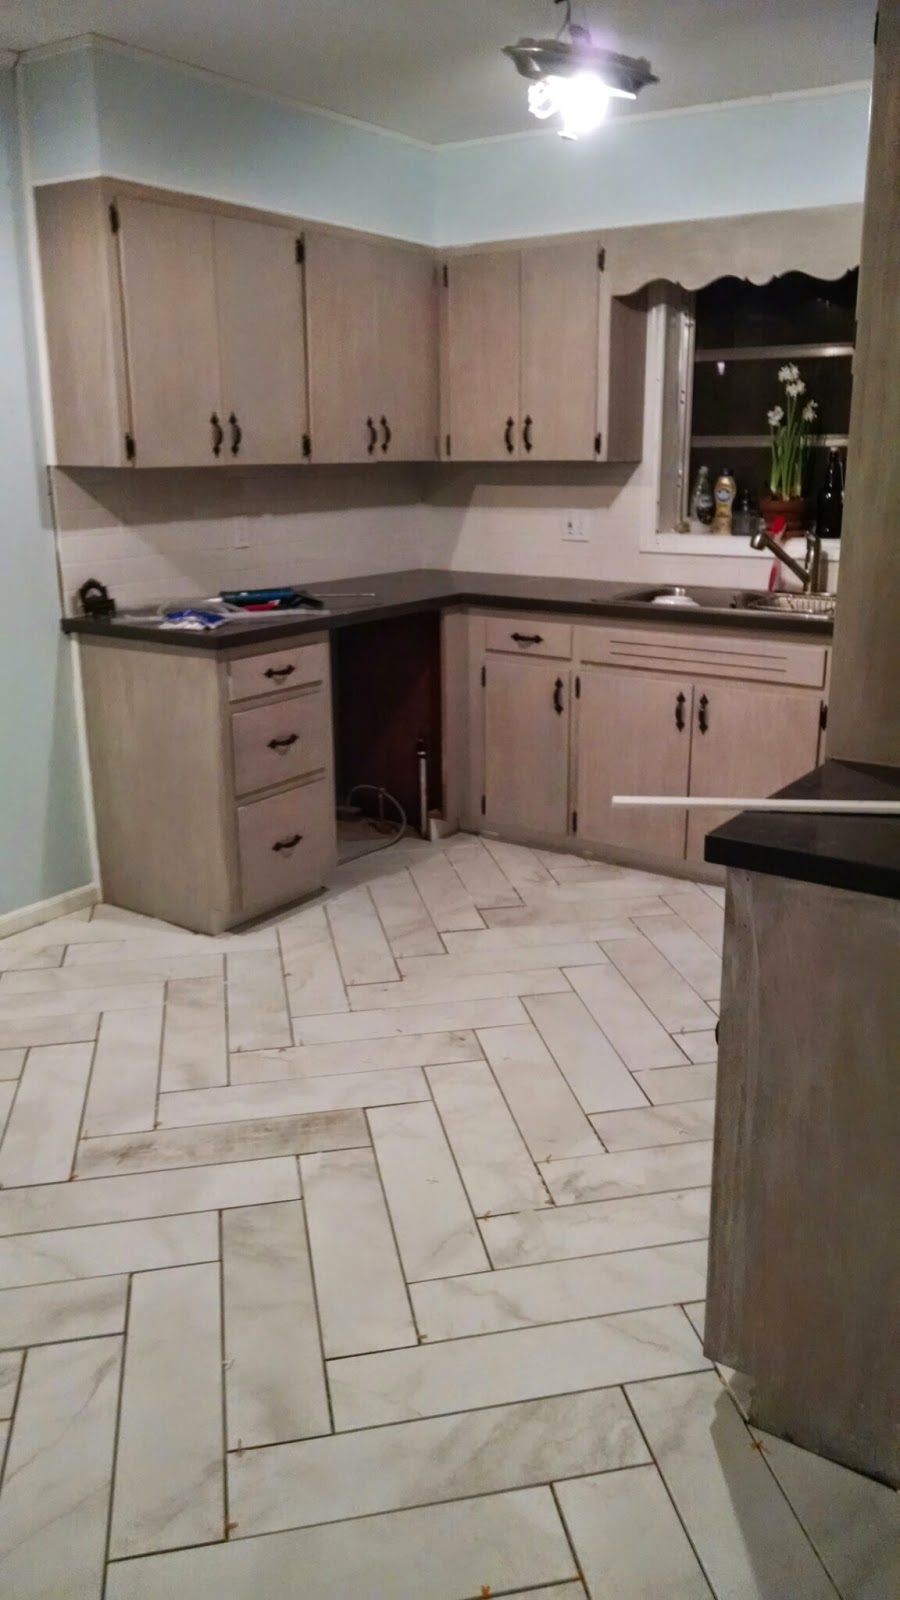
We ended up with the narrow white one (far left in the first pic).  It had a matte texture to it, unlike some of the others and stood out from the cabinets.  I feel like the white makes the kitchen look fresh and clean, even when it's not. :)


Because it's on the floor I wanted to go with a really dark gray grout. It  coordinated with the countertops. This way if it stained you wouldn't be able to tell.  My mom said it would look dirty all the time, but we did it anyway.  And you know what, it looks great and Mom thinks so too!! 
Win-Win!!


(The marbling in the tile makes it look less dirty too. )

If you read all of that you deserve a cookie. Thanks! 
Please let me know what you think, have you done a project like this? Do you have any tips for next time? 

Love,
Sarah