Showing posts with label Foster. Show all posts

Thursday, March 12, 2015

Here's my soapbox


       I'm just going to put it out there.  Don't smoke.  Please, there is tons of research out there saying it kills you, slowly.  With all the knowledge people have available about how bad it is, I honestly have no idea why people even start smoking.  It always kills me when I see a kid (you know, the ones who hopefully are at least 18 but look 15 or 16) smoking.  I think to myself, "don't you have anything better to spend your money on?" If you smoke to calm your nerves you could probably cure that problem with counseling or Dr. visits that would be cheaper than the 10+ years it took you to figure out you should never have stopped smoking.  

(image from Google)

        I love you all, even if you do smoke or have in the past, but please do yourself a favor.  Do your spouse or significant other a favor.  Do your children or future children a favor.  They love you and want you to be around for as long as possible.  It's not too late.   Our bodies are amazing and they can "heal" from smoking, it's possible.  


        I am sorry if anyone reading this feels I am speaking rudely or out of turn.  It comes from a place that cares about the human race and the health of others.  I saw what it did to my great-uncle who died of lung cancer.  It was tragic. 

        So, the secret I have been hiding about our house is that the lady who lived in our house before was a heavy smoker. dun. dun. dun. She smoked inside and we had to clean away the evidence.  It was nasty.  [If you must smoke, please go outside!]

OK, I am done.  Now I will show you why I feel so firmly about it.  Photographic evidence. 

The dining room-before.


These photos are from our dining room. It was where I started cleaning.  We scrubbed the baseboards, walls, windows, doors and trim with a TSP, vinegar and water solution.  When there was a tough spot we used baking soda to have a little grit.  What is TSP you ask? It is Tri-Sodium-Phosphate.  T.S.P.  It was the chemical that we read will get rid of strong odors (smoke) and strong stains (tar and nicotine build-up).   We found it at Home Depot.  


These are pictures of the cleaning process.  You can clearly see where I cleaned on the baseboard vs. where it hadn't yet been cleaned.  In person it was very clear on the wall too.  You might be able to see it above, but you might not.  Just know it's there.  I know, it's disgusting.   The dirty part was sticky and so dust and dirt was very good at sticking to it. [No wonder lungs get so dirty, that's the same stuff that gunks up a smoker's lungs]


This picture I took while I was scrubbing and wiping the wall.  You can see after I applied the TSP/Vinegar solution how the walls were "weeping" the nicotine and tar.  If you ever have to do this project start from the top and work your way down.  If you do it the other way you will end up doing it twice!  I know from experience. ;)  


This is what my water bucket looked like after about 10 minutes.  After about an hour it was quite a bit darker.  It was so satisfying to dump it out! 

 My arms and back were so sore the next day, so very sore.  It took a ton of "elbow grease" to get these stains off.  We did this in every room of the house.  Every wall all the trim.  It was disgusting.  However, we did, eventually, get the smell out.

***I think it's worth it for you to know now that we painted all of these surfaces after cleaning them.  We cleaned them first because the paint wouldn't have stuck to all that dirt and we wanted to get as much of it out of the house as possible so that it wouldn't "leak" out later [we heard that happens sometimes.]  I will post later about using Kilz on the whole house, but for now know that painting all of the surfaces was vital to getting the smell out.***

We used another crazy trick to get the smell out.  I read that bowls of charcoal would absorb the odor.  Well, we didn't have bowls so I put a few chunks on napkins/paper towels all around the house and in all the cabinets.  All our helpers and visitors asked if we had a giant rabbit. hahaha. Curiously, we are still finding them here and there.  Our dog had one in his mouth the other day, hopefully he didn't swallow any! (eeek!)


Well that's it. That's how we got the smell out of our house and my soap box (I promise you won't have to read many of those.)  See ya next time! 
Love,
Sarah


Thursday, March 5, 2015

The Concrete Stain Saga: part 1

The Second project that we did was also in the basement.  If you missed that first post about our Adventure with Drylok click here.  


Our second project was to use concrete acid stain to cover up oil stains in our floor and seal out moisture coming up from the ground underneath the concrete.  Daniel works at a Jewelry store and they have a stained concrete floor.  We both think it looks really awesome!  (I have seen some that have glitter in them, but I couldn't convince Daniel to sparklify our floors) 


Isn't that pretty? (picture from Google search)

The beginning of this and most DIY and home renovation projects is simple:  CLEAN. Clean the surface thoroughly.  Oh-ho-ho my friend, easier said than done. Easier said than done.  If you have ever tried to clean something that is really old, and porous, you'll understand.  You can't clean ALL the dirt off of 50 year old concrete floors.  You'll drive yourself mad.  But, do your best.  I think we could have gotten more dirt off the floor, but we got a lot of it and the rest is sealed up like a time capsule.  


First we swept the floor.  Then swept it again.  Actually, Daniel swept, he is really great at it.  I sucked up the dirt.  Luckily, we had a shop-vac.  Sweeping is boring so I didn't take a picture of that.  


Next up....The Grinder (read it again in a baseball announcer voice) :)

This process involved a diamond tipped grinder.  OoooOooo Fancy.  Nope not really, this thing was a beast.  [And as my knowledgeable, diamond informed husband told me, they may be diamonds, but they aren't jewelry grade, they are not a good color or clarity so they use them on machinery etc.]  We rented the Beast from Home Depot. (Our store of choice) And it's this great big machine that looks like a floor waxer except that it tries to rip off your arms. Alright, I am exaggerating, a little, but only a little. 


This was after when we were cleaning it. 
 So Daniel and his friend and co-worker Joseph rented the beast after work and started grinding the concrete basement floor.  

This is Joseph.


This is the grinder at work.  Honestly, I wasn't strong enough to steer this thing. 
The goal of the grinder is to scuff up the floor so that it will accept the stain and remove any surface stains.  To do this you have to add water to the floor in small doses so that it stays near the grinder's wheel.  If you don't have enough water the Beast can overheat. We added water with a hose that was fed through our window,  but you could easily use buckets or whatever was easiest for you. 

During the grinding process we met with a small hiccup.  Remember how I said we didn't get up ALL the dirt? Because you can't really get up ALL the dirt?  Well add water and concrete dust to really fine old dirt. What did you get? mud? Lots of mud? Lots of soupy icky mud? Well, you would be right.  This wouldn't have been a big deal except that we couldn't see if all our hard word was paying off.  It was impossible to see any scratches in the concrete until it was dry and clean.  So we had to stop and reassess.  


We got back up.  Another shop-vac to help get up all the mud and someone holding the hose full time.  The mud-sucking was the most time consuming part.  If your concrete is newer, outside or if you can clean it better before hand I think the mud would be less of an issue.  I will say that there is going to be mud even if you have brand-new concrete, because the grinder is essentially a giant sander and we all know that when you sand something you get dust and dust+water=mud.  After we finished grinding the whole basement we went back through with the hose and shop-vacs and rinsed the floor.  Let me tell you, all of our backs hurt and all of us wanted to throw those shop-vacs out the window.  While we are talking about it, two things about those shop-vacs: 1) surprisingly, the smaller one sucked up the water/mud better and 2) it was really hard to get just the right angle so the suction would kick in but eventually with practice it worked. 


This is what it looked like when we were done.  We weren't able to get ALL the water up, so we just let the little puddles air dry.  


When it was all dry, it looked like this. ^^^ If you look closely you can see the circular scratches.  We were so proud of those scratches and glad to see that all the work and frustration had been for a reason! 


Ok, I think that's enough for today.  God bless you if you read all the way to this point. :)  This isn't the most thrilling project out there.  Read the next post to see why we did all this: Concrete staining! 


See ya later,
Sarah


P.S. I love comments. I love to know who's reading and hear your thoughts and opinions! Thanks a bunch!! YOU'RE AWESOME! 


Thursday, February 26, 2015

Jumping right in...Our Adventure with DryLok

Today I want to start telling you the story of our renovation process: Moisture proofing the basement.  Are you all jumping up and down with excitement? Yeah me neither.   To be honest, this whole blog is probably going to be a little boring at first, but I want to keep an accurate record and some people actually asked about this so...here it goes.  


First there are some things you should know about us:
Daniel, my husband is a very hard worker, go get 'em, don't rest until it's done or he's burned out kind of guy.  While,  I on the other hand, am a work on ten projects at a time slowly getting them all done.  Daniel is a very time focused man.  If it was up to him, we would never be late.  Which of course means that I am the one who makes us late 90 out of 100 times, the other 10 are reasons out of our control. ;-) 

Now that you know those things about us, you can imagine the frustration we both felt over the course of this renovation.  Our first project was hard to decide on.  Where do you start in a house where EVERYTHING (this is really only a slight exaggeration as you will see) has to be ripped out or painted and cleaned?  Well, we decided to start in the basement.  We figured that we could do what we wanted to the basement and then store stuff down there and move our stuff slowly upstairs as the rest of the house was ready.  As often happens with best laid plans, none of that happened, but more on that in a later post.  


First of all, I regret to inform you that for this particular project, I don't have actual photos of us doing the work.  However, in the picture above you can see the white strip of paint around the bottom of the cinder block wall?  THAT is our first project.  It's this fancy stuff called DryLok.  We found one gallon of it at a yard sale for free along with some other fabulous things including our kitchen light! When we started using this stuff we learned 4 things: 1) It's smelly. ewww. 2) It's thick and the cinder block is greedy when you apply it. 3) this was going to take much longer than we thought and 4) we were going to need quite a bit more.  We had several options: 
a gallon? 
A big bucket? 
  
a different brand? 


I had done a little research on this stuff.  DryLok blocks moisture from coming into your basement, specifically through concrete/cinder block walls.  It's called masonry paint.  The big question was: Is this stuff worth it?  Did we really need it?  We sort of agonized over this.  We didn't want our basement to flood or be damp.  It is "underground" on 2 1/2 sides, but it's not in a flood plain or anything so do we even need to worry about it? Looking back, it definitely wasn't the biggest decision (wait until we get to stain color, eeeekkk!)  This stuff was rather expensive though, as far as paint goes and we had JUST made the biggest purchase of both our lives so far.   So being a "thrifty" (read that: cheapskate), I looked on craigslist.  I found some for $10.  YES!  We bought the rest that we needed.  

****For lack of pictures let me tell you about our basement.  It is a large rectangle.  There is a door at one end and a crawl space that runs the length of one side.  It is open except for support poles here and there and the stairs that come down from the main floor.  One of the shorter walls has a door and the other is solidly holding back all the dirt.  The long wall along the back of the house is mostly windows that are underneath the back deck and about 1/3 holding back the dirt.  The long wall along the front side of the house has a crawl-space going along the length of it so not much of it is actually holding dirt back. ****

The plan was to do all of the basement walls, but once we found how difficult it was to apply properly we opted for the whole wall that is all underground and then about 1/3 of the two long walls. The rest of the way around was mostly the bottom 2  or 3 rows of blocks.  We do plan to finish painting the rest of the basement walls with something other than drylok "someday" (I am beginning to become wary of the elusive someday, because it never gets here!!)  

Here is a sample picture of what it looks like to apply drylok, notice she is using a high nap roller.  This means that there are longer strands on the roller so it can hold more paint and reach all the crevices. (photo from Google)


*Sorry, for the lack of interesting and eye catching photos.  I think I kept track of most of the other projects we did.  Also, I will check with Daniel and see if he has better photos of the drylok project.

 
**My husband would like to point out that proper application of drylok involves etching the walls first, which calls for another product (etching power etc.).  This is tough to do because it is hard to wash cinder blocks without a hose. (Both pictures below are from Google)


***David my brother also helped out by doing some minor patching along the floor.  I don't have pictures of him doing it but here is a picture from the internet (Google search) of someone else doing the same thing.  We got the product (drylok fast plug) with the drylok we bought from Craigslist. 
So do you have any questions I didn't answer?  Do you have experience with this stuff?
I would love to know! 


See ya next time,  
Love,
Sarah

Saturday, February 21, 2015

The Foster House--House Tour (before)

Ok guys, bear with me, this post has a LOT of pictures! 

The Foster house.  Our house.  <3
       
This "F" came from one of our dear friends, he said "Now
you have a big F in yard" :)
Our cute little front porch

Our ultra retro kitchen....yeehaw. 

The door from the kitchen to the carport.

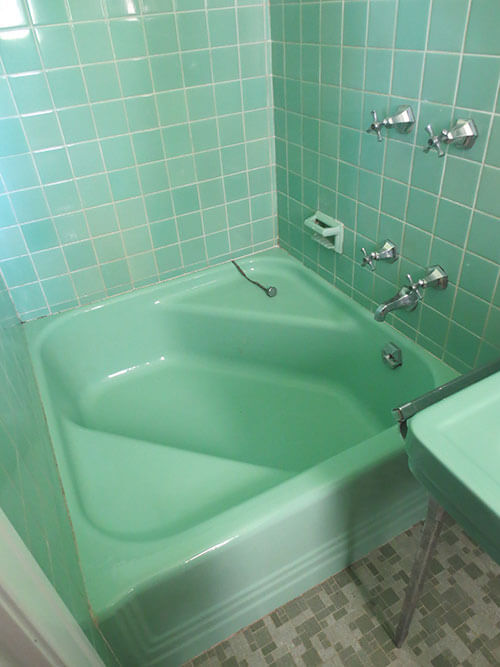
Our bathroom.  The only room in the house to have prior renovations. 
We think that the shower area, which is HUGE, used to be a Cinderella tub. 
something like this was probably in that shower space.
 (picture from retrorenovations.com a great source for retro inspiration!)
Another angle of the shower
I was so stoked about the new house!!

Daniel's closet.  The Master has two closets this size. 


The closet I claimed had only shelves. yes, has is past tense. 

This is a wide angle of our room.  Two great big windows! 

This is the guest bath, dubbed the "blue bath", the original wood floors

blue blue blue!!!

view from the hallway

The guest room closet was painted green....

the "office"

the Hallway

The dining room after we removed the light fixture
The back deck that we have high hopes for....someday soon. :)

The living room, with it's big ole' window!
You can really see the smoke damage around the vent. YUCK!!!


SO,  I hope that gives you a good idea of what the house looked like before.   I am excited to share with you in the coming days and weeks what the house looks like now!!!


Love,
Sarah