Showing posts with label home depot. Show all posts

Wednesday, May 6, 2015

the kitchen floor saga

Ok, I know it's a tad dramatic to use the word saga, but it's true.  It's so true.

Maybe it's just that I'm a woman,or maybe I'm too much of a cheapskate, but I changed my mind and couldn't make up my mind about this floor so. many. times.

Just for reference, this project started with ordering materials back in early October and we finally got the floors in somewhere around late January/Early February.


Let's start at the very beginning,

(a very good place to start...
Whoops, I'm getting off track, I'm about to start singing.)  

Ok, floors.  So, first of all: keeping what we had was not an option.  It was gross and nasty and had to go.  But we were smart about it.  We did ALL of the painting and staining throughout the house before we replaced any of the flooring so as not to mess up our brand new floors.


While we were doing all the painting around the house, I thought about, designed, researched and ordered materials for the kitchen floors. When I was planning and designing something inside me knew that red and light blue was a super retro combination for a kitchen.  I knew we were updating a lot of things and keeping the color scheme retro I hoped would make the updates fit in with the older feel of the house.  

Below are pictures of what our cars looked like when we picked up the order.  Saggy. Those boxes were SO VERY heavy.


as a side note, I also ordered materials for the backsplash.  I LOVE hexagons and penny tile, they are so cute and vintage and just adorable. However, as cute as I thought they were  I didn't think the blue went well with the blue on the walls and I thought the hexagons looked a little cluttered with the floors I was considering.  Maybe knowing what I know now, I would have used the hexagons with white grout, but what we went with was MUCH cheaper.


So because we had to paint and clean and repair so much when we first moved in and we had to replace some things, we were spending money left and right.  More than I ever thought, so I tried to find the best price on durable but cheap materials.  This led me to VCT tile.  That's the stuff you see in Hospitals and Schools. 


They are 12x12 vinyl tiles that come in lots of colors. At about 68 cents a tile, I figured they would work. 


I ordered 7 different colors of grey because there were no samples in any store.  I ordered all the grays I thought might work so that I could see the actual colors in our kitchen.  These 5 made it to round 2.  I also ordered a box of red to use as an accent tile.  I compared them all to see which two grays I would use with the red.  When we stained the cabinets and got the countertops it made the choices a little easier because we had other greys to compare it to.


I drew up some pattern plans. These involved cutting and slicing the tiles with a tile cutter. 
It would be very involved, but I figured it would be worth it in the end. 

You may want to get up and stretch at this time. 
 I know this is a long one, but really I'm just getting started. 

After we stripped, stained and sealed the cabinets we started peeling off the floor. Well, sounds easy, but it was so much more than just removing the old sheet vinyl.  We had to remove three layers of sheet vinyl and three layers of glue and replace parts of the floor that were water damaged and rotting.

Yikes.  


So we (we: Jeff with help from Daniel, while I cleaned something or painted something) had to replace the sub floor under the dishwasher and under the refrigerator.   The basic process of that was to pull up/cut up the vinyl over layer so that we could see exactly where to cut.  Some of this was visible from the basement below and some of it could be felt when it was walked on and most of it was visible to Jeff's trained eye because of warps and dips in the vinyl. 


So after that was in Daniel scraped up the rest of the floor.  Which took. FOR.EV.ER. 
You can probably tell from the pictures, but it came up in very small pieces.  The top layer came up fairly easily.  The bottom two layers had a very strong glue between them and they were brittle from age.  It was painstaking. 


Then under the (sort of cute) faux pebble layer on the bottom was a blue/grey felt-like backer. (Pictured above along with the under dishwasher patch) Dun.Dun.DUN.  Yeah, we think it was probably Asbestos. Ew.  Daniel and our friend Lena and Daniel's brother Seth, used hot water soaked towels to get it up so they wouldn't inhale any more particles than they had already disturbed.  They got most of it up this way and we decided to leave the tough patches, it wouldn't hurt right? **This is not a researched or proven method, it just seemed right for us at the time**


So then to level out the floor and prepare it for tile.  I did some research and found that there was a self-leveling compound(float) that could be bought at the Home Depot.  Sweet. We can spread stuff on a floor.  When Seth was here, he did it for us.  It was great!! It looked great, it took more "float" and time than we thought, but it looked great.  So we left it to dry.  

When we came home to find it dry, we walked across it and it cracked!!!! NOOOOO! It was the Asbestos felt that was loosened by the wet float. (Mr. PotatoHead needed his angry eyes)  So, we (again, we is Seth and Daniel) scraped that part up and got up all the felt, then poured more float. UGH. but now it was really done.  And it looked great. :)

So we talked and we debated and we talked some more. We asked friends and family who knew about replacing floors and we decided that we should go with real tile because: it's grouted, so it's more forgiving of the cuts, it's classier, it will sell better when we decide to sell and it's not too many more dollars.

So out we go again to shop for tile.  We went to Floor and Decor and Home Depot and all the other Home Depots in the area. To make this brief, I am going to just show you all the pictures I took of the options we considered.


(that last one is at the Fox, I wish I could have found something like it that wasn't $$$)


So we ended up with the three options below.  I posted these pictures to FB and let the people vote. Also, my parents and Daniel's mom and Seth and Lena and Jeff all let us know their thoughts. 


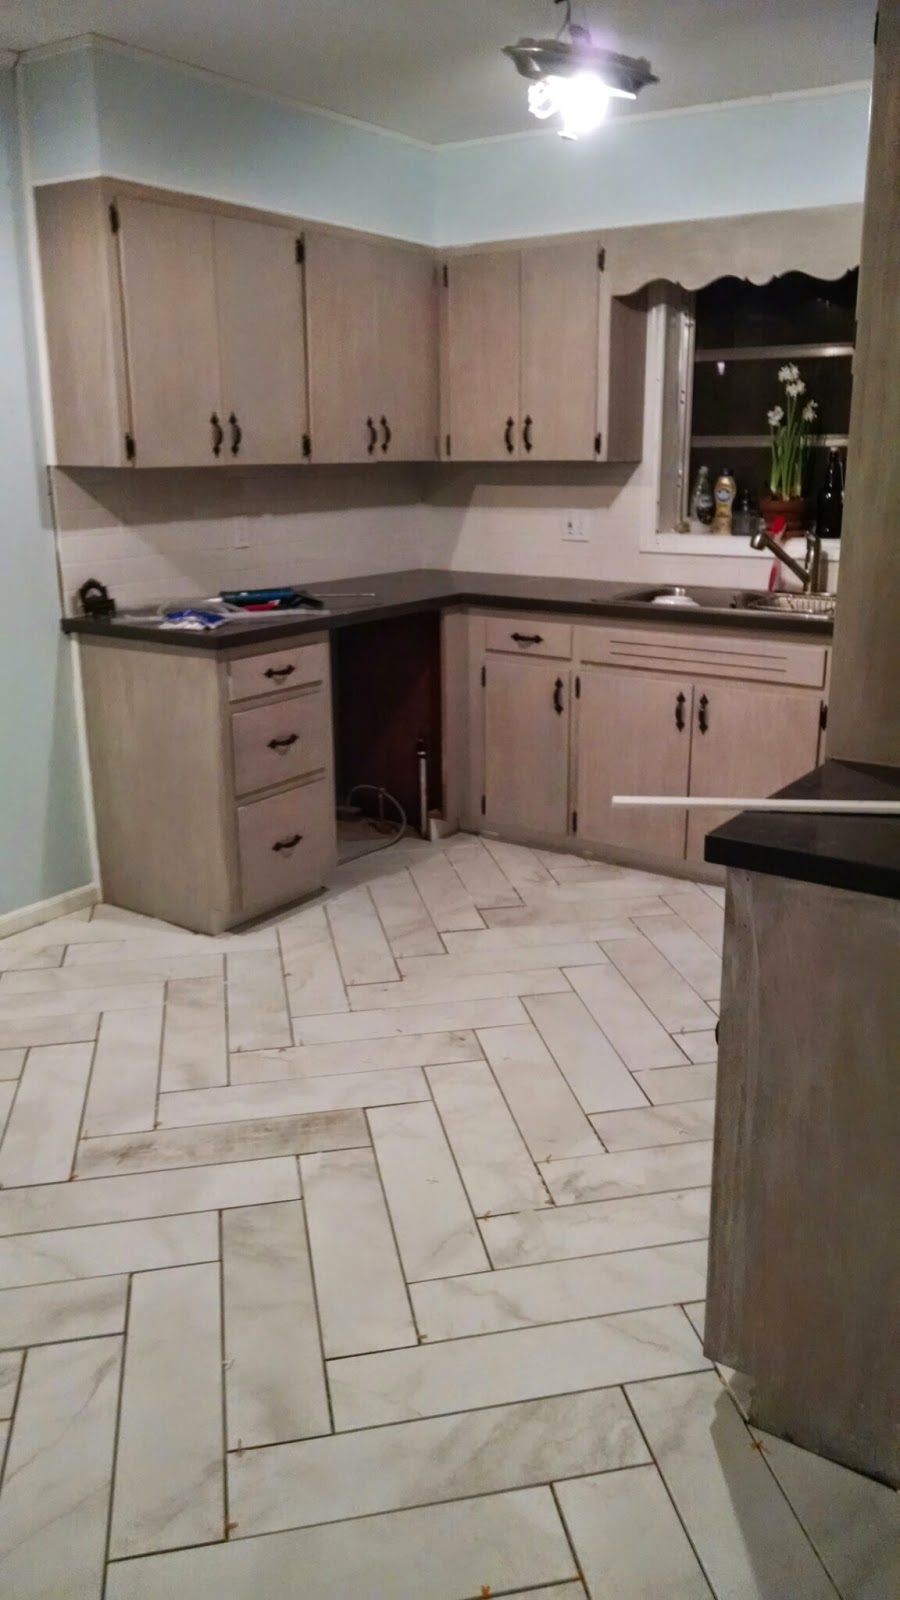
We ended up with the narrow white one (far left in the first pic).  It had a matte texture to it, unlike some of the others and stood out from the cabinets.  I feel like the white makes the kitchen look fresh and clean, even when it's not. :)


Because it's on the floor I wanted to go with a really dark gray grout. It  coordinated with the countertops. This way if it stained you wouldn't be able to tell.  My mom said it would look dirty all the time, but we did it anyway.  And you know what, it looks great and Mom thinks so too!! 
Win-Win!!


(The marbling in the tile makes it look less dirty too. )

If you read all of that you deserve a cookie. Thanks! 
Please let me know what you think, have you done a project like this? Do you have any tips for next time? 

Love,
Sarah

Wednesday, April 8, 2015

Foster House Color Palette

When we started choosing paint colors for the house I was a little bit overwhelmed.  We were spending SO much money on things I knew I wanted to try to find some paints on sale.  I had read that people were finding "oops" paint or "mistints" for a fraction of the list price at Home Depot and Lowes.  Whenever we were at Home Depot or Lowes I started looking in the paint section when we weren't even under contract yet.  If I found a color I liked I bought it.  


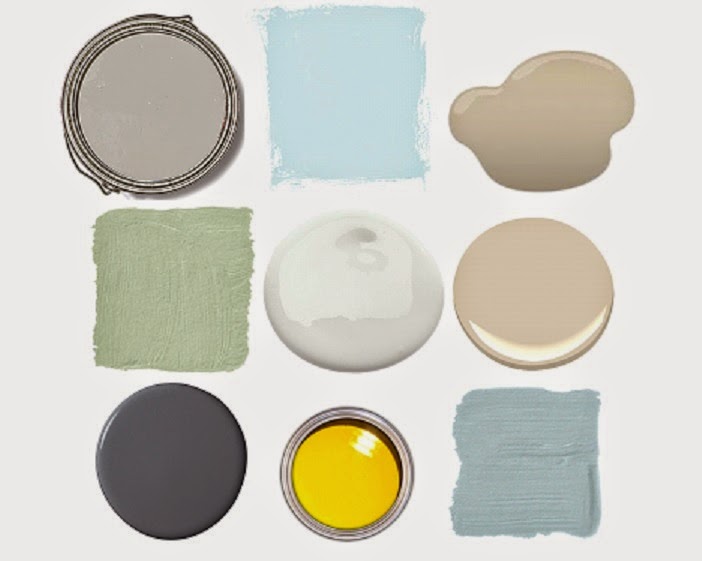
When we finally got into our house and cleaned and kilzed and were ready for color we had to decide where all the colors would go.  That was the hard part.   I sat down and looked at the colors we had: a soft grey-ish blue, a pale green, light blue, silvery gray and a mushroom.  I had some ideas of where I wanted things.  The light blue was for the kitchen, to give it a retro look.  I planned to pair it with a bright red. The mushroom was for the living room.  But I didn't know where the other colors would go.   I decided to sit down and plan it out, with Daniel of course.


Side note: I LOVE HGTV magazine. They always have such great ideas! I always feel so inspired. So while I was at Barnes and Noble I read some of one and found some amazing paint ideas.  I didn't use any that they suggested but I love that they have them ALL listed in the back! [Also, sometime I would love to do a colored grout between white tiles. genius.] I did decide from this magazine that I should choose a whole house color scheme so it would be cohesive when/if ever we sold it. :) 


This painting is one of a trio that were given to us for our wedding, painted especially for us by one of my mother-in-love's friends.  (For those of you who aren't catching on to the irony here, my maiden name is Beach...get it now? good!)

I looked at the colors we had and the ones I was thinking about and it was a very beachy/coastal color scheme.  Lucky for me, Labor Day sales were around the corner.  The paint we hadn't already bought we ended up buying on sale in the colors we wanted. 


(all these samples are not completely accurate but are approximate, 
if you want an actual name I can find it for ya!)

What rooms are these colors in? (L-R as follows)
Silver/gray: Dining room
Light blue: Kitchen
Mushroom gray/brown: Living room
Seafoam green: Craft Room/Office
White: Hallway
Sandy Tan: Guest room/book room
Storm Gray/Brown: Master bath
Sunshine Yellow:Guest bath
Silvery gray blue: Master bedroom

We really like it.  It feels homey. 

I'll post pictures of painting each of the rooms when I do updates on what each room looks like now. 

What do you think? Do you see the "beach" in our color scheme? 

love,
Sarah


Thursday, March 26, 2015

The Long Journey to Counter Tops

Counter tops.  What to I have to say about counter tops?  You don't usually think too much about them. Well Kitchens need them. Ours NEEDED replacing. I think there are LOTS of ugly options. Pretty options are mucho mooolah. ($$$$$$)  
That's the short version. 
[If you don't like reading, scroll to the bottom to see the final picture]

(I made these large so you can see better.  The lighting is not good, sorry)
Please excuse the mess, it's a construction site after all. :)


The deal is: Our house is 50 years old.  The kitchen is 50 years old.  The original oven and range were barely working. They were that awesome (ly-hideous) extra special shade of burnt orange/brown. Oh yay.  So obviously, those had to go.  I wanted to keep them and paint them for nostalgia. Daniel wanted to use them as planters.  So we tried to sell them on Craigslist.   No takers. None. Zip. Nota. A whole lot of Nothing. So.....we "sold" them to a recycling place for about $20.  Ok, well now they are out of our carport. Hip, hip, HOOORAY.  The hubs is much less annoyed now. I feel like I have betrayed them, but it wasn't working out. You have to know when the relationship is over. Ya know?  

Yeah, so back to counter tops. Ours were a lovely beige laminate, not the cool kind with metal trim. Just plain pinky-beige.  They had to go. Oh, I said that already? Sorry. 

So we did "research."  I used pinterest.  I found this stuff. 


It had some pretty terrible reviews. I believe bad reviews are a direct consequence of people using the product incorrectly (usually) but I wasn't going to do a bunch of irreversible stuff to our counter tops to have it not work. NO, not going to happen. The hubs is NOT on board. He hated the idea. 

So, I got another idea (from pinterest, of course) 


I said to my self, "Self, this is a great idea! It will look so industrial cool and vintage-y at the same time."  This was my plan. Now to convince the hubby.  Well I did, kind of, but everyone else we mentioned it to said "poo poo."   I read lots of reviews on this too. Some said it worked amazingly.  Some said it cracked after a little while.  I finally found a lady (the Pioneer Woman, I believe) who put several different counter tops in her home.  Concrete being one of them. She said that it was nice, but that she couldn't cook easily on it. Now, I am no Pioneer Woman, but I did want a low maintenance counter top I  could easily cook on and it was clearly not going to be concrete. :-( 

So the hunt continues. 


Copper? 
Looks nice. Really expensive and stains easily.  (The hubby hates stains)
Stainless Steel would also have shown lots of scratches and fingerprints etc. I did not want to have to buff my counter tops every day. No.

I loved the look of the recycled glass (but, $$$$) Not for us. 


So we turned to the ever popular granite (after quickly ruling out marble $$$$)

We looked online,  at Home Depot, at a place near in Kennesaw, at a place way up in Alpharetta:

Expensive, and not exaclty what we wanted. (sorry for the horrible pic! eek!) 

There is purple in this one. A no-go with the Hubs.

This one was nice, but  I wasn't sold.  (Confession: I dislike decorating with black.)

This one had a lot of olive green tones. As I was looking to paint the walls baby blue, this was not going to work. 

There were a lot of ok options, but nothing I loved. Nothing I thought would fit in with the "image" I felt our kitchen would have. (Wow, how pretentious does that sound) I felt that the kitchen would not look "put-together" with these options.  Re-sale value is top in our minds (because even though at this point Daniel says we are never moving again, if we have three kids this house is going to get small fast, however, that time is still a ways off so no worries) so we wanted to pick something that looked nice and would keep looking nice for years to come. 

Ugh. Rock and a hard place.  Budget and Value. The great balancing act. 

So we went to Home Depot, (people there knew our names there for a while.) We were just looking at options when a very nice Orange Apron swept us off our feet.  He sat us down and sold us on (my favorite, but very expensive) Silestone. Woah. Bet you didn't see that coming. It was on sale. (my favorite word!) 15% plus if we opened a home depot credit card we could get it for an additional 10% off and have 24 months with no interest.  Usually I just say NO to all that credit card mumbo jumbo but when he worked out how much the monthly would be and the total.  I was drooling. We went home and thought about it. Asked for some wise counsel from parents and friends. 

Then we did it. We bought our counter tops. This was a big (huge!) purchase for us, but one we were excited and ready to make. 


 Here is my proud husband in our kitchen with our brand-new counters!! Yay! We chose Silestone in Merengo, it's a dark gray that I thought would look nice with the other colors I had in mind. The close up is not a super close up, but I'll post one of those when I post the "done" kitchen pictures.  

So that's it for now. 

Love,
Sarah