Showing posts with label kitchen. Show all posts

Wednesday, May 6, 2015

the kitchen floor saga

Ok, I know it's a tad dramatic to use the word saga, but it's true.  It's so true.

Maybe it's just that I'm a woman,or maybe I'm too much of a cheapskate, but I changed my mind and couldn't make up my mind about this floor so. many. times.

Just for reference, this project started with ordering materials back in early October and we finally got the floors in somewhere around late January/Early February.


Let's start at the very beginning,

(a very good place to start...
Whoops, I'm getting off track, I'm about to start singing.)  

Ok, floors.  So, first of all: keeping what we had was not an option.  It was gross and nasty and had to go.  But we were smart about it.  We did ALL of the painting and staining throughout the house before we replaced any of the flooring so as not to mess up our brand new floors.


While we were doing all the painting around the house, I thought about, designed, researched and ordered materials for the kitchen floors. When I was planning and designing something inside me knew that red and light blue was a super retro combination for a kitchen.  I knew we were updating a lot of things and keeping the color scheme retro I hoped would make the updates fit in with the older feel of the house.  

Below are pictures of what our cars looked like when we picked up the order.  Saggy. Those boxes were SO VERY heavy.


as a side note, I also ordered materials for the backsplash.  I LOVE hexagons and penny tile, they are so cute and vintage and just adorable. However, as cute as I thought they were  I didn't think the blue went well with the blue on the walls and I thought the hexagons looked a little cluttered with the floors I was considering.  Maybe knowing what I know now, I would have used the hexagons with white grout, but what we went with was MUCH cheaper.


So because we had to paint and clean and repair so much when we first moved in and we had to replace some things, we were spending money left and right.  More than I ever thought, so I tried to find the best price on durable but cheap materials.  This led me to VCT tile.  That's the stuff you see in Hospitals and Schools. 


They are 12x12 vinyl tiles that come in lots of colors. At about 68 cents a tile, I figured they would work. 


I ordered 7 different colors of grey because there were no samples in any store.  I ordered all the grays I thought might work so that I could see the actual colors in our kitchen.  These 5 made it to round 2.  I also ordered a box of red to use as an accent tile.  I compared them all to see which two grays I would use with the red.  When we stained the cabinets and got the countertops it made the choices a little easier because we had other greys to compare it to.


I drew up some pattern plans. These involved cutting and slicing the tiles with a tile cutter. 
It would be very involved, but I figured it would be worth it in the end. 

You may want to get up and stretch at this time. 
 I know this is a long one, but really I'm just getting started. 

After we stripped, stained and sealed the cabinets we started peeling off the floor. Well, sounds easy, but it was so much more than just removing the old sheet vinyl.  We had to remove three layers of sheet vinyl and three layers of glue and replace parts of the floor that were water damaged and rotting.

Yikes.  


So we (we: Jeff with help from Daniel, while I cleaned something or painted something) had to replace the sub floor under the dishwasher and under the refrigerator.   The basic process of that was to pull up/cut up the vinyl over layer so that we could see exactly where to cut.  Some of this was visible from the basement below and some of it could be felt when it was walked on and most of it was visible to Jeff's trained eye because of warps and dips in the vinyl. 


So after that was in Daniel scraped up the rest of the floor.  Which took. FOR.EV.ER. 
You can probably tell from the pictures, but it came up in very small pieces.  The top layer came up fairly easily.  The bottom two layers had a very strong glue between them and they were brittle from age.  It was painstaking. 


Then under the (sort of cute) faux pebble layer on the bottom was a blue/grey felt-like backer. (Pictured above along with the under dishwasher patch) Dun.Dun.DUN.  Yeah, we think it was probably Asbestos. Ew.  Daniel and our friend Lena and Daniel's brother Seth, used hot water soaked towels to get it up so they wouldn't inhale any more particles than they had already disturbed.  They got most of it up this way and we decided to leave the tough patches, it wouldn't hurt right? **This is not a researched or proven method, it just seemed right for us at the time**


So then to level out the floor and prepare it for tile.  I did some research and found that there was a self-leveling compound(float) that could be bought at the Home Depot.  Sweet. We can spread stuff on a floor.  When Seth was here, he did it for us.  It was great!! It looked great, it took more "float" and time than we thought, but it looked great.  So we left it to dry.  

When we came home to find it dry, we walked across it and it cracked!!!! NOOOOO! It was the Asbestos felt that was loosened by the wet float. (Mr. PotatoHead needed his angry eyes)  So, we (again, we is Seth and Daniel) scraped that part up and got up all the felt, then poured more float. UGH. but now it was really done.  And it looked great. :)

So we talked and we debated and we talked some more. We asked friends and family who knew about replacing floors and we decided that we should go with real tile because: it's grouted, so it's more forgiving of the cuts, it's classier, it will sell better when we decide to sell and it's not too many more dollars.

So out we go again to shop for tile.  We went to Floor and Decor and Home Depot and all the other Home Depots in the area. To make this brief, I am going to just show you all the pictures I took of the options we considered.


(that last one is at the Fox, I wish I could have found something like it that wasn't $$$)


So we ended up with the three options below.  I posted these pictures to FB and let the people vote. Also, my parents and Daniel's mom and Seth and Lena and Jeff all let us know their thoughts. 


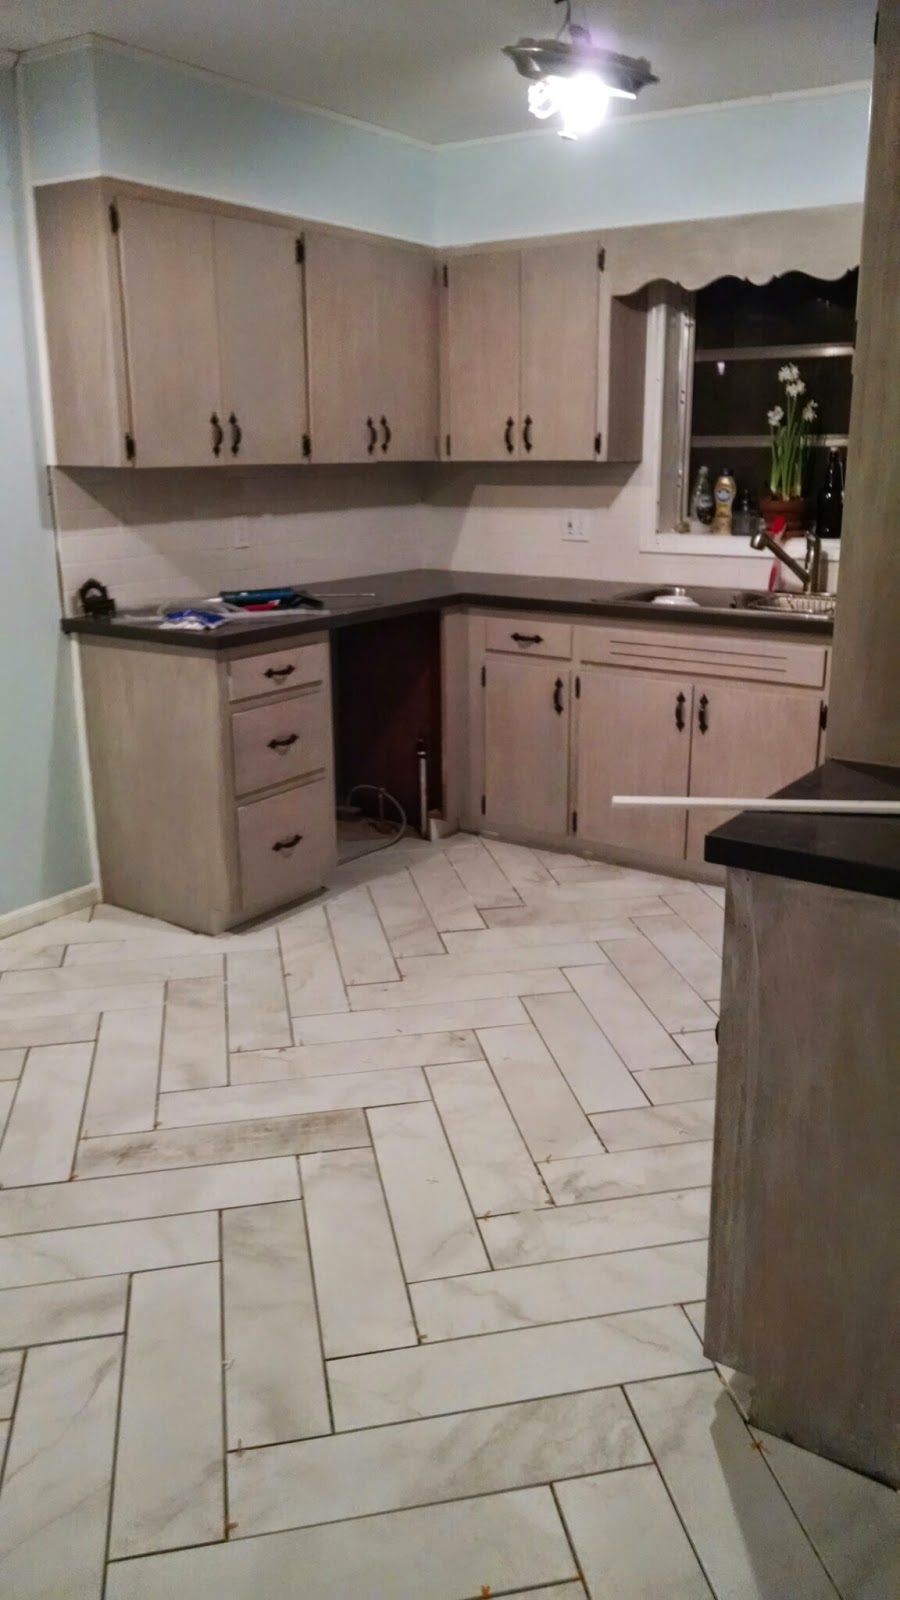
We ended up with the narrow white one (far left in the first pic).  It had a matte texture to it, unlike some of the others and stood out from the cabinets.  I feel like the white makes the kitchen look fresh and clean, even when it's not. :)


Because it's on the floor I wanted to go with a really dark gray grout. It  coordinated with the countertops. This way if it stained you wouldn't be able to tell.  My mom said it would look dirty all the time, but we did it anyway.  And you know what, it looks great and Mom thinks so too!! 
Win-Win!!


(The marbling in the tile makes it look less dirty too. )

If you read all of that you deserve a cookie. Thanks! 
Please let me know what you think, have you done a project like this? Do you have any tips for next time? 

Love,
Sarah

Monday, April 27, 2015

Cabinet Liners

So this post is pretty simple, but I think it's a cute detail so I thought I would share.  

Because our cabinets are 50 years old and when we cleaned them there was so much dirt (etc.) trapped in the stain we decided it would give us peace of mind about using all of our dishes if we put liners inside the cabinets and drawers. 

Well of course, that got me thinking about finding something cute to put there.  I realize I haven't shared all of the kitchen with you yet, but I will soon, just one more detail to finish! ;-) 

For the colors in the kitchen I tried a fairly retro combination: cherry red and baby blue.  The cabinets (you can read about those here) are a light grey and the counter tops (more on those here) are dark grey.  You don't know it yet, but the kitchen floors are white with grey grout.  So I felt like with all that grey I could play with some bright colors!  My original intention was to put red accent tiles on the floor, but we decided that would be visually overwhelming.  I still really wanted my red accents, so these liners were the perfect solution!  


The liner themselves are made out of what is called oil cloth.  It is a laminated canvas or cotton.  The laminated part means that there is a plastic/vinyl type "seal" on the top, but it is also thicker than contact paper, which means it is far more durable.   This stuff is also very easy to clean, just wipe it down! Once I had settled on oil cloth I had to find a cute one with a red and white print.  I settled on Fabric.com's red and white polka dots!  They are so cute and fit perfectly with my sort of "retro" theme.  I ordered 8 yards and simple measured and cut to fit.  I have tons left over.  I am glad I over estimated though, I would rather have too much than too little! 

I might even make a cute tablecloth out of the extra. (The one below I found on Oilclothaddict.com, via pinterest.) I would love to put elastic around the edges so that it's easy to take outside and clean off!  

Ok, enough about that, this is how I did it: Measure. Cut.  Trim.  Spray Adhesive (outside).  Stick in Place.  Adjust.  Smooth.  Next Piece.   


It's a pretty simple process, however it was made slightly more complex because I had to take everything out of the cabinets.  The silver lining in that is that it gave me the opportunity to move things around in the kitchen while I had everything out.   


As you can see, I didn't get all the wrinkles out and some of the pieces will have to be trimmed still.  And to be honest, I still have about 1/3 of the cabinets/drawers left to finish.  Let's face it, blogs aren't always a perfect as they seem.  I am trying to give a true (but typically cleaner than usual) representation of our life at the Foster house.  It's not perfect, but neither are we.  PTL. 


Do you love it as much as I do? Do you hate it? Do you have any experience with Oilcloth?  Don't you love it!!?  It's an impressive fabric, and becoming a favorite. :)

Until next time,
Sarah


Tuesday, April 7, 2015

progress in kitchen and dining room


I just wanted to show off some of our latest projects.  Our new lights in the kitchen and dining rooms and a pots and pans hanger.  Yipppee!


Today I thought I would share a little about our dining room light fixture.  I had seen this paint at Target but had no need for it at the time. (Also I was wondering why in the world Target was selling paint? Strange.)  It's a perfectly lovely shade of pale, pale green. 


We wanted to return the light fixture that we had lived in the dining room for 49 years to it's place, but it was in need of a good makeover.  Our wonderful friend Jeff took it apart (he helped us with MOST of the wiring that was in dire need of updating.)  


I painted all the pieces.  It took several coats.  While the color of Target's paint was beautiful it wasn't the best for coverage.  It probably isn't very durable either, but that doesn't matter so much on the light fixture.  


After it was painted Jeff helped us to reattach it to the ceiling.  He also picked out these awesome light bulbs that look fantastic without the bulky globes.  


He has all kinds of awesome video tutorials and info about vintage lights!

One more bonus picture: 


This is my mother-in-love's front porch from this last Christmas, courtesy of the Christmas Craftsman, aka. Jeff. 


love,
Sarah


Monday, April 6, 2015

Cabinets

 Just to recap, this is what the kitchen looked like before.  It was COVERED in that orange-y wood.  It was everywhere. Even the walls. It was a little bit charming, in a woodsy cabin kind of way, but not for us.  We removed the two horseshoe shotgun holders that were above the door and we began to see potential.


Let me give you a brief recap on what happened.  I don't have pictures of all of this unfortunately.  :-(

My parents took the doors off (we didn't label them!) We used this stuff called citrus-strip on the doors to take off the finish.  This was grueling labor.  Fifty year old Varnish doesn't come off easily.  We probably should have done two kinds of varnish/stain remover or two passes of the citrus strip and a washing with mineral oil in between but I was so very over it that  I didn't.


After the counter-tops were in I knew I wanted the cabinets to be gray too.  I sort of hated to cover up all the wood, because it was beautiful, just too much pine.  So my thought was to do a gray "whitewash."  Well my friends, it seems that this is not a common choice because there was very little to choose from.


I really wanted to use a product like the ones below because I thought it would be easier, but alas, they didn't have any in Gray.  :-(

We ended up with a water based tinted gray that was really dark, a white wash that was called pickled white and a clear sealer.  I was impatient so I sort of blended them together.  to get the look I was after.  These were some of the samples that I tried on an inconspicuous area. (As a side note: we didn't get the wood that clean, that is untouched wood that was previously covered by the laminate backsplash and the inside of a cabinet.) 


Another reason that this was a bad sample of what it would look like later is that this was raw wood and almost everywhere else had been stripped, but still had a slight stain to it. 


This is how they turned out.  for some reason there is a slight pink/orange hue.  It is probably because  I didn't do the whitewash before I did the graywash. But who knows.   I think they look pretty cool.  Daniel likes them too.  (We spray painted the hardware: first with a metal primer in white and then in a oil rubbed bronze, two coats, more on that at another time!)


If I had it to do all over again I would do a few things slightly different:
1) I would be more patient. (Ugh, yes I was VERY impatient about getting it done, but now I wish I had taken more time.) 
2) I would do a whole coat in the whitewash, then a whole coat in the gray-wash, then a whole coat in the pickling whitewash. (That's why I was so impatient, I sort of smeared all those together in 1 coat)
3) I would have also done the inside of the doors.
4) While we are on doors, I would have labeled them from the start. Big mistake!
5)  I wish I had known more about Chalk paint.  I think I would have considered it. (Maybe it isn't off the table)


Well next time I'll show you the floors and then what the kitchen looks like now!
love,
Sarah